Wood Slice Ornaments: Simple Designs on Pre-Cut Slices
Turn bought pre-cut wood slices into rustic tree ornaments with three easy painted designs: a three-stroke tree, a wreath of dots and a snowy half-dip, plus how to hang slices that have no hole.
Tutorial at a glance
Materials
- Pre-cut wood slices with bark edges
- Fine sandpaper, around 220 grit
- Acrylic craft paint
- Small flat and round brushes
- Low-tack painter's tape
- Water-based brush-on sealer
- 8 in (20 cm) of jute twine per ornament
Wood slice ornaments are one of the quickest ways to get a rustic, natural look on the tree, because the hard part is already done for you. Craft stores sell bags of pre-cut slices with the bark still on, sanded flat and often drilled with a hanging hole. All you add is a little paint and a loop of twine.
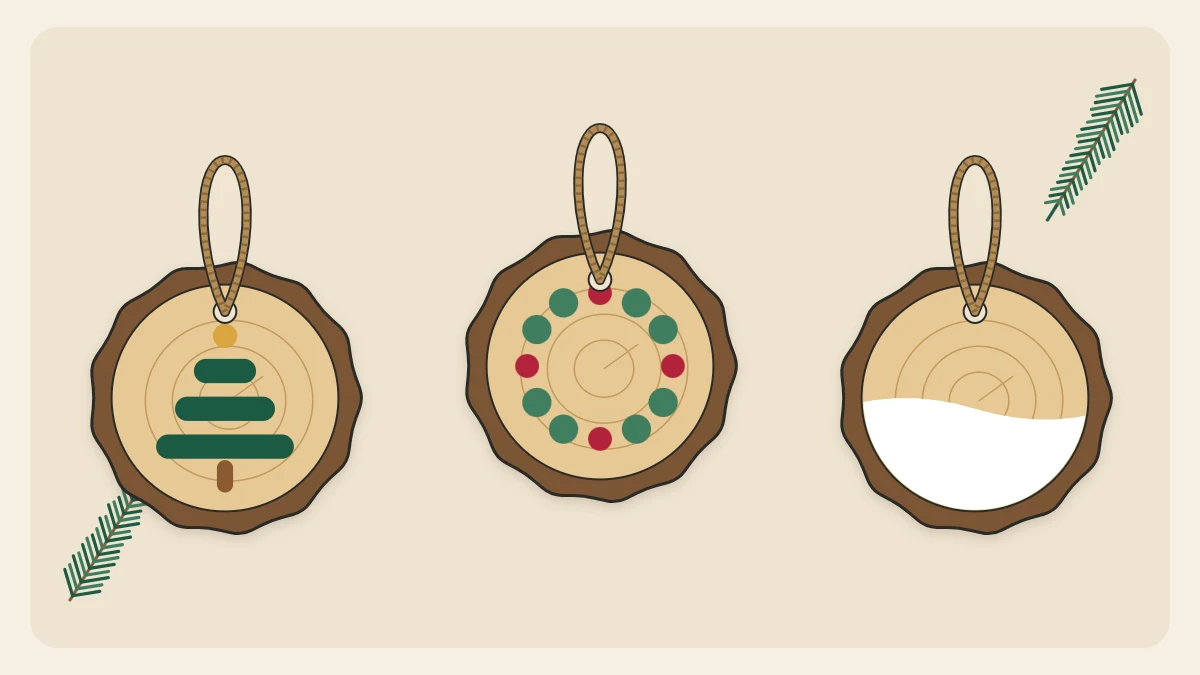
The three designs below need no drawing skill: a tree built from three strokes, a wreath made of dots and a snowy half-dip. Each one takes a few minutes of actual painting, with drying time in between.
What you need
- Pre-cut wood slices, about 2 1/2 to 3 1/2 in (6 to 9 cm) across and roughly 1/4 to 3/8 in (6 to 10 mm) thick, with a pre-drilled hole if possible
- Fine sandpaper (around 220 grit) or a small sanding block
- A dry, soft cloth or an old soft brush for dusting
- Acrylic craft paint in green, white, red and brown
- A small flat brush, about 1/4 in (6 mm) wide, and a fine round brush
- Paint pens with a fine tip (optional)
- Low-tack painter’s tape and a pencil
- Water-based brush-on sealer
- Jute twine, 8 in (20 cm) per ornament
Choosing and preparing the slices
Sort the slices first. Pick ones that lie flat, have bark firmly attached all the way around and show no cracks running in from the edge.
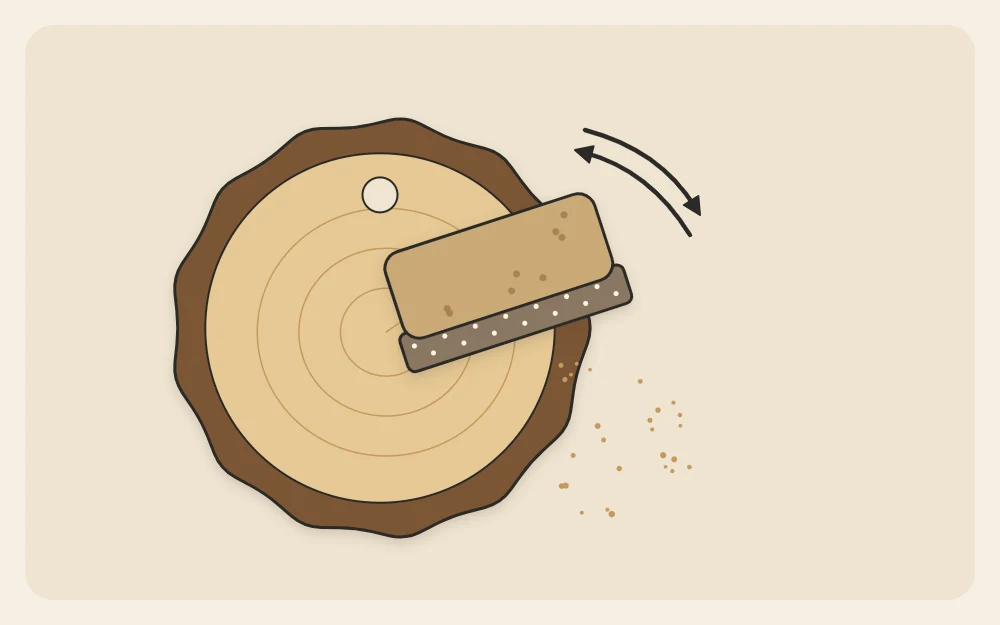
- Sand the face you plan to paint with light pressure in small circles. A slice is cut across the grain, so there is no grain direction to follow. Stop when the surface feels smooth to a fingertip, usually well under a minute.
- Sand the back the same way if you plan to write on it later.
- Brush or wipe off every trace of dust, including the dust caught in the bark. Dust left on the face mixes into the paint and makes it gritty.
- Check the hole. If it is clogged with sawdust, push a toothpick through to clear it.
Tip
The cut face of a slice is thirsty and can pull thin paint outward into fuzzy edges. Brushing on one thin coat of sealer and letting it dry before you paint gives much crisper lines, especially with paint pens.
Paint pens versus a brush
Both work, and many people use the two together. A brush covers larger areas faster and lets you mix your own colors. A paint pen is easier to control for outlines, dots and lettering, which makes it a good choice if you want to add a name or year as described in these personalized ornament ideas.
| Tool | Best for | Watch for |
|---|---|---|
| Flat brush | Tree strokes, the half-dip, filling shapes | Too much paint on the brush leaves ridges |
| Round brush | Trunks, small dots, touch-ups | Needs a steady hand for fine lines |
| Paint pen | Outlines, dots, names and dates | Can feather on bare wood; test on the back first |
Design 1: a tree from three strokes
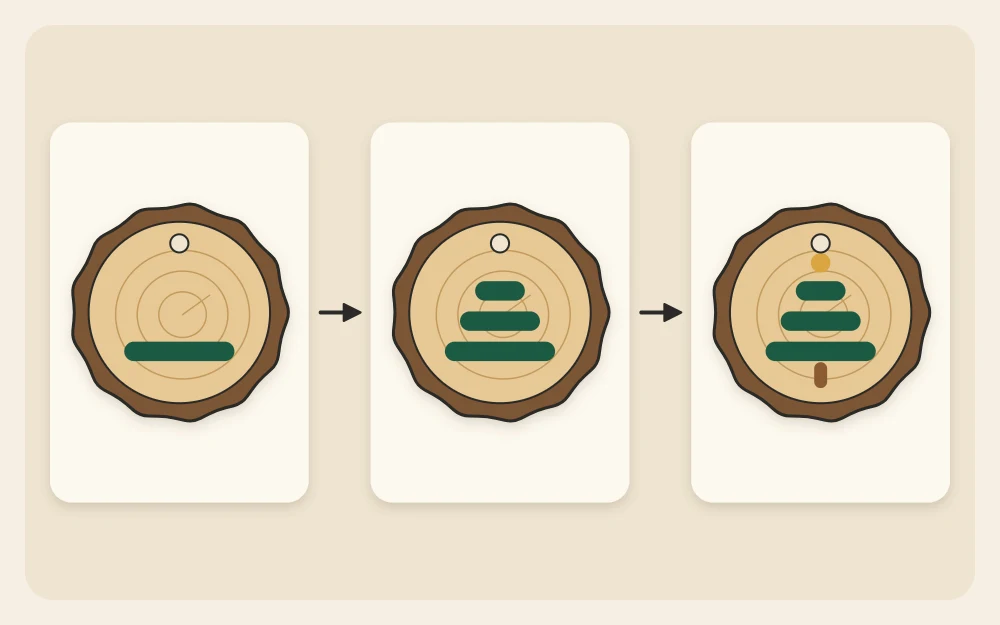
- Load the flat brush with green paint and wipe one side on the rim of the pot.
- About one third of the way down the slice, press the brush down and pull one short horizontal stroke, roughly 1/2 in (12 mm) long.
- Just below it, overlapping slightly, pull a second stroke about 1 in (2.5 cm) long, centered under the first.
- Add a third stroke below that, about 1 1/2 in (4 cm) long. You now have a stepped triangle.
- With the round brush, paint a short brown trunk under the bottom stroke.
- Once the green is dry to the touch, add a single dot on top using the handle end of a brush dipped in white or red paint.
Design 2: a wreath of dots
- Place a bottle cap or small lid, about 1 1/2 in (4 cm) across, in the center of the slice and trace around it very lightly in pencil.
- Dip the handle end of a brush in green paint and print dots along the pencil line, re-dipping for every dot so they stay the same size.
- Add a second ring of dots just inside or outside the first, placing each new dot in the gap between two existing ones.
- Let the green dry, then add three small red dots in a cluster at the bottom or top of the ring.
Design 3: a snowy half-dip
- Press a strip of low-tack tape straight or diagonally across the slice. Rub the edge down firmly with a fingernail.
- Paint the lower section white, brushing away from the tape rather than toward it so paint is not pushed under the edge.
- Let it dry to the touch and add a second thin coat.
- Peel the tape back slowly at a low angle while the second coat is still slightly damp.
For more on base coats, brushes and clean taped lines, see the guide to painted wooden ornaments.
Sealing and adding the twine loop
Leave the paint to dry fully; several hours is a safe minimum, and overnight is better. Brush a thin coat of water-based sealer over the painted face, keeping it off the bark, and let it dry before turning the slice over to seal the back. Drying time depends on the room and the product, so follow the label. The article on how to finish handmade ornaments compares matte and gloss finishes in more detail.
Thread 8 in (20 cm) of twine through the hole, bring the ends together and tie them in an overhand knot. Slide the knot around until it sits just behind the hole.
What to do with slices that have no hole
You have two options, and neither needs a drill.
A small screw eye
Use a screw eye about 1/2 in (12 mm) long on slices at least 3/8 in (10 mm) thick. Flake away a tiny patch of bark at the top, press a pushpin into the middle of the edge to start a hole, then twist the screw eye in by hand until the ring sits snug. This is a job for an adult, since the points are sharp.
A glued-on ribbon tab
For thinner slices, fold a 6 in (15 cm) length of ribbon in half and glue both ends side by side to the back of the slice with thick tacky glue, overlapping the wood by about 1 in (2.5 cm). Glue a small circle of felt or cardstock over the ends, rest a book on top and leave it overnight before hanging.
Frequently asked questions
Do wood slices need to be sealed before painting?
It is optional, but helpful. The cut face absorbs liquid quickly, so thin paint and paint pens can spread into fuzzy edges. One thin coat of water-based brush-on sealer, left to dry fully, gives a less absorbent surface and sharper lines. Thick acrylic craft paint applied with a brush usually behaves well without it.
Why is the bark falling off my wood slices?
Bark loosens as a slice dries out and shrinks, and rough handling speeds it up. Choose slices with bark that feels firmly attached, handle them by the faces and keep sealer off the bark so it stays natural looking. A loose section can be reattached with a little thick tacky glue and left overnight.
What size wood slice is best for tree ornaments?
Slices about 2 1/2 to 3 1/2 in (6 to 9 cm) across suit most trees. They are large enough to paint a simple design on and light enough for a branch to hold. Thickness of roughly 1/4 to 3/8 in (6 to 10 mm) keeps the weight down while staying sturdy.