Paper Star Ornament: A Layered Five-Point Star
Draw an even five-point star with a circle and five marks, cut three sizes from cardstock, score each one into ridges and stack them into a layered ornament with a hidden loop.

Tutorial at a glance
Materials
- Cardstock in three colors
- Scrap paper for templates
- Pencil, ruler and compass
- Scissors
- Blunt scoring tool
- Thick tacky glue
- 9 in (23 cm) of baker's twine
A paper star ornament does not need special paper or a printed pattern. This one is built from three cardstock stars in decreasing sizes, each scored so that its points rise into soft ridges, then stacked with the hanging loop hidden between the layers.
The only slightly technical part is drawing a five-point star that is even all the way around. A circle and five marks take care of that.
What you need
- Cardstock in three colors, such as red, cream and gold-toned yellow; one letter-size sheet of each makes several stars
- A sheet of scrap paper or thin card for the templates
- Pencil, ruler and a compass, or three round objects to trace
- A protractor (helpful, but there is a way around it below)
- Scissors
- A blunt scoring tool, such as an empty ballpoint pen or the back of a butter knife
- Thick tacky glue and a toothpick
- 9 in (23 cm) of baker’s twine or thin ribbon
Sharp scissors are an adult tool. Children can do the tracing, scoring and gluing, with an adult cutting the points.
Draw the star template
- Draw a circle 4 in (10 cm) across on scrap paper. If you use a compass, the pin leaves a dot at the center, which you will need. If you trace a glass or a lid, cut the circle out, crease it lightly in half twice, and mark where the creases cross.
- Make a mark at the very top of the circle. This will be the top point of the star.
- Add four more marks, evenly spaced around the edge. With a protractor centered on the dot, mark every 72 degrees. Without one, set your ruler to a little under 2 3/8 in (6 cm) and step it around the circle from the top mark, adjusting until five equal steps bring you back to the start.
- Number the marks 1 to 5 in order. With the ruler, join 1 to 3, 3 to 5, 5 to 2, 2 to 4, and 4 back to 1. Each mark is joined to the two marks farthest from it.
- Go over the outer outline of the star, ignoring the small pentagon in the middle, and cut it out.
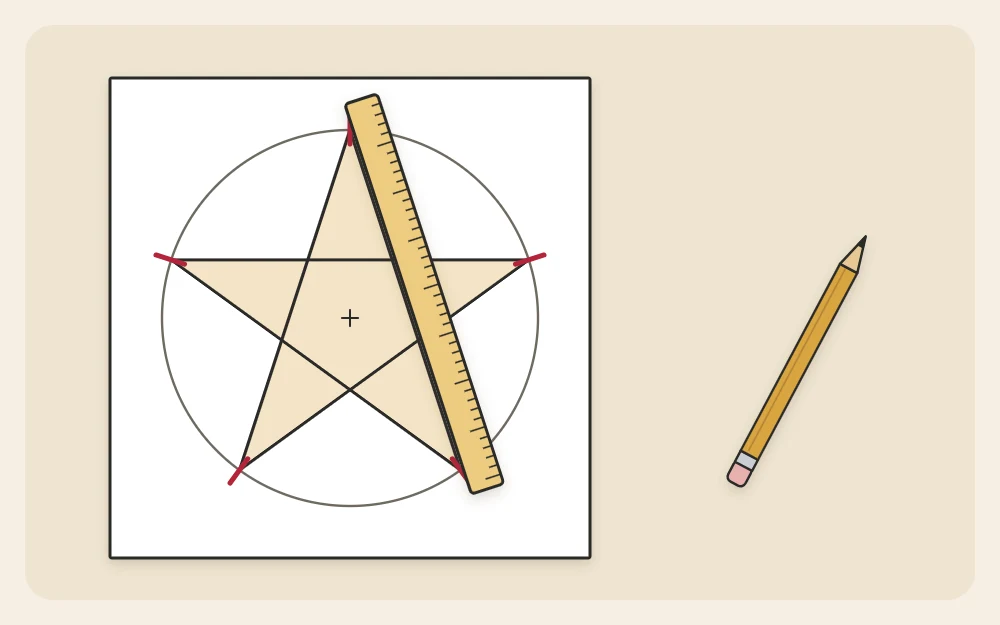
Repeat on a 3 in (7.5 cm) circle and a 2 in (5 cm) circle, using steps of about 1 3/4 in (4.5 cm) and just under 1 1/4 in (3 cm). You now have three templates.
Cut three stars
Trace each template onto the back of a different color of cardstock: the large star in the darkest color, the medium one in the lightest, and the small one in the accent color.
Cut just inside the line so no pencil shows. Cut from the tip of each point in toward the notch, then from the next tip toward the same notch. Two cuts meeting in the corner give a sharper notch than turning the scissors.
Score and shape the stars
Scoring means pressing a groove into the cardstock without cutting it, so the paper folds exactly where you want. Work on a soft surface such as a magazine or a cutting mat.
- Lay a star face up. Place the ruler from the tip of one point to the notch directly opposite. The ruler should pass through the center of the star.
- Draw the scoring tool firmly along the ruler from tip to notch, once.
- Repeat from each of the other four points. You will have five score lines crossing at the center.
- Fold the star in half along one score line, colored side out, press the crease with a fingertip, and open it again. Do the same along the other four lines.
- Now shape it. Each line has a long half that runs out to a point and a short half that runs to a notch. Leave the long halves as raised ridges, and push each short half down the other way so it becomes a valley.
- Pinch gently around the star until all five points have a ridge down the middle and the center stands up like a low peak.
Score and shape all three stars in the same way. Keep the folds shallow: the center of the large star only needs to rise about 3/8 in (1 cm) off the table.

Add the loop and stack the layers
- Fold the twine in half and tie the two ends together in a single knot about 1/2 in (1.3 cm) from the tips.
- Lay the large star face up. Place the loop along the ridge of the top point, with the knot resting about 3/4 in (2 cm) above the center peak, and fix the knot with a small dot of tacky glue.
- Using the toothpick, put a dot of glue on the center peak of the large star and a small dot partway along each ridge, about 1/2 in (1.3 cm) out from the center.
- Set the medium star on top with its points lined up over the large star’s points, so the two shapes nest. The knot is now hidden between them. Press lightly at the center for about 30 seconds.
- Glue the small star onto the medium one in the same way.
- Leave the ornament face up to dry for about an hour, or as long as the glue label suggests, before hanging it.
Press only at the center while the glue sets, so the ridges stay crisp. If the layers will not sit together, one star is folded more deeply than the others; open it out a little until it nests.
Troubleshooting
- The cardstock cracks along the folds. The score was too light, or the paper is very thick. Score a second time in the same groove before folding.
- The star hangs at a tilt. The loop has slipped off the top ridge. There is more on balance and loop placement in the guide to ornament hanging loops.
Variations to try
Turn the medium star so its points sit between the points of the large one, for a ten-point burst. The layers then touch only along the creases, so hold them a little longer while the glue grabs.
Use a single color in three shades for a quieter look, or cut the smallest star from patterned scrapbook paper.
If you enjoyed the scoring, try accordion-fold paper ornaments next, which use the same tool for pleated fans and rosettes. For a rounder shape made from simple strips, the paper strip ball ornament uses up the cardstock left over from this project.
Frequently asked questions
What paper is best for a layered star ornament?
Medium-weight cardstock, the kind sold for card making, holds a scored ridge well and cuts cleanly with ordinary scissors. Plain printer paper is too soft to keep its shape, and very heavy card tends to crack along the folds unless you score each line twice.
How do I draw a five-point star without a protractor?
Draw a circle and mark the top. Set a ruler to slightly more than the radius, about 2 3/8 inches for a 4 inch circle, and step it around the edge. Adjust the step until five equal moves return to the first mark, then join every second mark.
Can children make this paper star?
Yes, with help. Tracing the templates, scoring along a ruler and gluing the layers are all manageable for school-age children. Cutting the narrow points and notches needs sharp scissors, so that step is best done by an adult or closely supervised.