Ornament Embellishment Ideas: Beads, Buttons, Stitches and Trim
Decorate handmade ornaments with buttons, beads, sequins, four easy embroidery stitches and flat trims, and learn three placement rules that stop a design from looking cluttered.

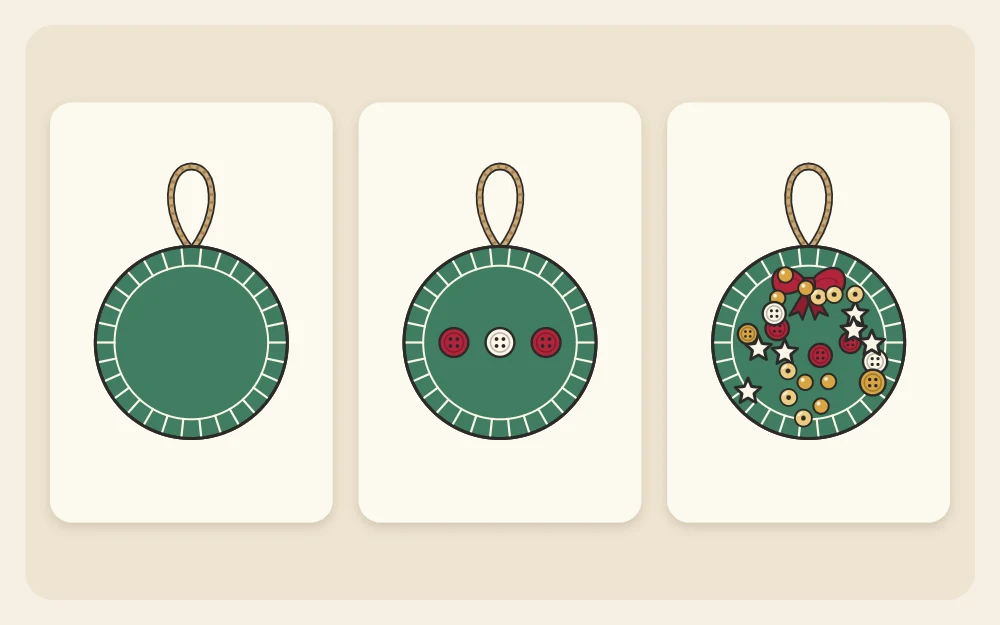
The best ornament embellishment ideas are usually the smallest ones: three buttons down the middle of a felt tree, a line of stitching around a heart, a single bead at the tip of a star. Decoration is what turns a cut-out shape into something that looks finished, but it is also the stage where a handmade ornament most easily tips over into clutter.
What follows is a practical look at the trims worth keeping in your craft box, four easy stitches, a few simple rules for placing things, and how to decide between thread and glue.
Start with less than you think
A tree ornament is seen from a few feet away, among lights and dozens of other ornaments. Fine detail disappears at that distance, while clear shapes and strong contrast carry. One well-placed detail reads better than ten scattered ones.
A useful habit is to lay every decoration on the ornament loose, before any glue or thread comes out. Step back, take away one item, and look again. Stop removing things only when the ornament starts to look bare.
Buttons, beads and sequins
Buttons are the easiest place to begin. Small ones, around 3/8 to 1/2 in (10 to 13 mm) across, suit an ornament 3 to 4 in (7.5 to 10 cm) tall. Two-hole and four-hole buttons can be sewn on with a contrasting thread so the stitches become part of the decoration.
Beads come in two useful families. Wooden beads are light, warm in color and good for the top of a loop or the base of a tassel. Glass-style beads, including small seed beads, catch the tree lights and work as berries, snow dots or the center of a flower shape.
Sequins give the most sparkle for the least weight. Sew each one with a single stitch across it, or anchor it with a seed bead: bring the needle up through the sequin, through the bead, and back down through the sequin hole.
Watch out
Buttons, beads and sequins are small parts. Keep them out of reach of young children and pets, hang decorated ornaments on higher branches, and check now and then that nothing has worked loose.
Four simple stitches
Embroidery on felt needs no hoop and no pattern transfer. Use two or three strands of embroidery floss and a needle with an eye large enough to thread easily. Needles are adult tools; younger crafters can use a blunt plastic needle on pre-punched felt.
- Running stitch: the needle goes up and down in a dashed line, with stitches and gaps about 1/8 in (3 mm) long. Use it for borders and for joining two layers.
- Backstitch: each new stitch goes back to meet the end of the last one, making a solid line. Use it for stems, outlines and lettering.
- French knot: bring the thread up, wrap it twice around the needle, and push the needle back down right beside where it came up while holding the thread taut. It leaves a small raised dot for berries, eyes and snow.
- Blanket stitch: a looped stitch worked over the edge of the felt. It closes two layers and frames the shape in one pass.
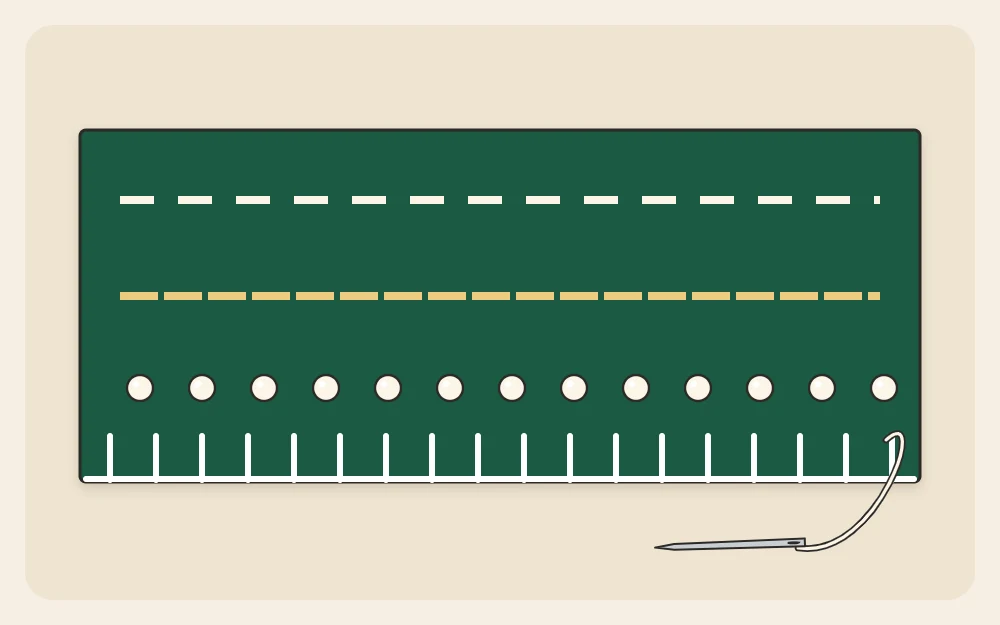
A project such as the felt snowflake ornament is a good place to practice, because straight stitches and French knots are all it needs.
Ribbon, rickrack and paper trims
Flat trims add a band of color without adding weight. Rickrack, the wavy woven braid sold by the yard, makes instant garlands across a felt tree or a zigzag hem on a mitten. Narrow ribbon, 1/8 to 1/4 in (3 to 6 mm) wide, can be glued in stripes, tied into a tiny bow, or wrapped around a wood shape.
On paper ornaments, a hole punch does the same job. Punched dots become snow or berries, and a small star or circle punch gives you neat shapes to layer. Save the punched-out pieces from one project to decorate the next.
Painted details count as embellishment too. Dots, dashes and stripes made with the handle end of a brush are covered in the guide to painted ornament patterns.
Where to place embellishments
Placement matters more than quantity. Three rules cover most situations:
- Use odd numbers. Groups of one, three or five look balanced without looking stiff. Two or four tend to pair off and feel formal.
- Follow a line. Set pieces along the center, around the edge, or in a gentle curve. Decorations placed along a line look planned; decorations scattered at random look spilled.
- Leave empty space. Aim to keep at least half of the surface plain so that each detail has room around it.
Size helps as well. If you use three buttons, try graduating them from large at the bottom to small at the top, which echoes the shape of a tree and draws the eye upward.
Thread or glue?
Both methods are cold and both work. The choice depends on the surface and on how much handling the ornament will get.
| Method | Best for | Keep in mind |
|---|---|---|
| Sewing with thread | Felt and fabric; buttons, beads and sequins | The most secure hold; knot on the back and hide the knot between layers |
| Thick tacky glue | Wood, clay and cardstock; flat-backed pieces and trims | Use a small dot and press for about 30 seconds; let it dry flat for several hours |
| White craft glue | Paper to paper, punched shapes, thin ribbon | Spread it thinly with a cotton swab so the paper does not ripple |
Whichever you choose, add embellishments before you close up a two-layer ornament. That way every knot ends up hidden inside. Drying times vary with the product and the room, so follow the label and leave pieces undisturbed until the glue has gone fully clear.
Keep the meaning in view
Decoration can also carry a message. A stitched initial, a year in backstitch or a button saved from a favorite old coat makes an ornament personal in a way that extra sparkle never does. There are more ways to do this in the collection of personalized ornament ideas.
Frequently asked questions
What can I use to decorate a plain felt ornament?
Small buttons, seed beads, sequins, rickrack, narrow ribbon and simple embroidery all work well on felt. Start with one type of trim in a group of three, placed along a line, and add more only if the ornament still looks bare from a few feet away.
Is it better to sew or glue beads onto ornaments?
On felt and fabric, sewing is more secure and lets you hide the knots between layers. On wood, clay and cardstock, a small dot of thick tacky glue is the practical choice for flat-backed pieces. Round beads have very little surface to grip, so sew them wherever you can.
How do I stop an ornament from looking overdecorated?
Lay everything out loose before attaching anything, then remove one item at a time until the design looks clear. Keep about half of the surface plain, use odd-numbered groups, and limit yourself to two or three kinds of trim on a single ornament.