Painted Ornament Patterns: Dots, Stripes and Simple Motifs
A pattern library for people who cannot draw: dots, stripes, zigzags, plaid, sprigs, stars and snowy dots, with tips on choosing a three-color palette and spacing marks evenly.
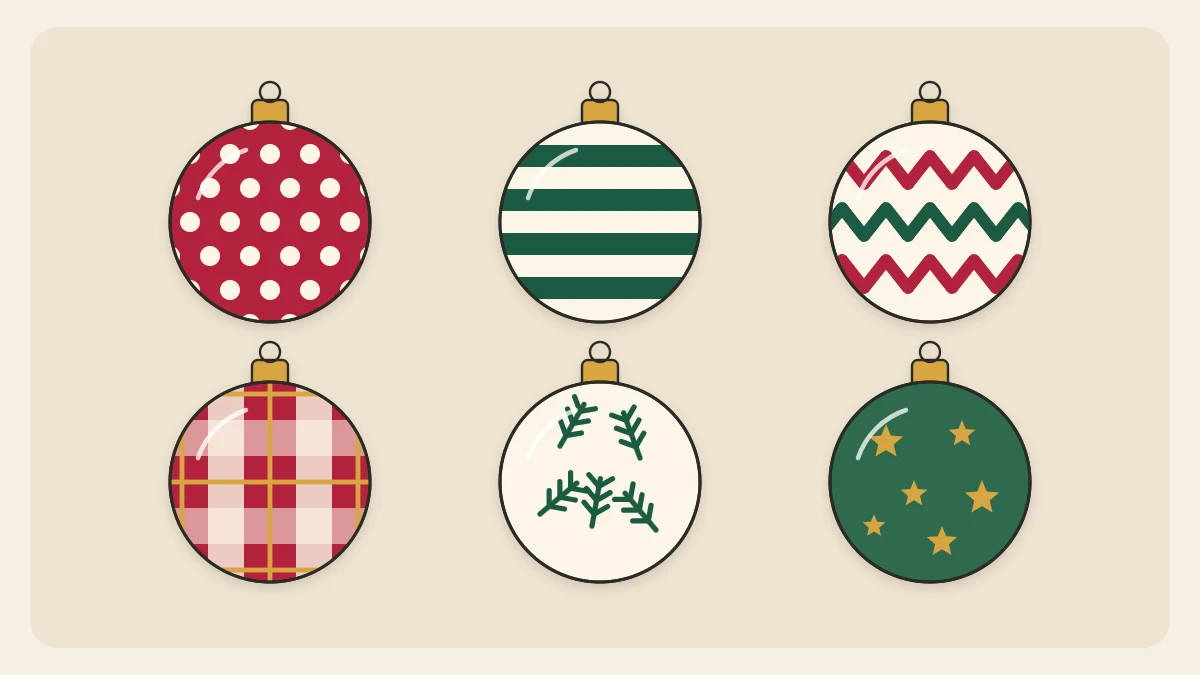
You do not need to be able to draw to decorate an ornament well. The painted ornament patterns in this library are all built from two marks anyone can make: a dot and a short stroke. Repeat them with even spacing and a limited set of colors, and a plain disc turns into something that looks planned.
Every pattern here works on any smooth, base-coated surface. If you have not painted a base yet, start with the guide to painted wooden ornaments, then come back and choose a pattern.
Before you start: palette and practice
Three colors plus white
Too many colors is what makes handmade ornaments look busy. Pick three that sit well together and add white, then use only those across the whole set. A reliable way to choose is one dark, one mid-tone and one accent.
- Traditional: deep green, red and gold, plus white
- Nordic: navy, soft red and pale gray, plus white
- Woodland: forest green, rust and cream, plus white
Use one color as the base coat and the others for the pattern. Then swap the roles on the next ornament. The set will match without any two pieces being the same.
Practice on paper first
Trace around your ornament on scrap paper several times and try each pattern inside the outlines. Five minutes of practice shows you how much paint to load, how big your dots come out and how many stripes fit across the shape. It is also the easiest way to compare color combinations before committing to one.
Dots
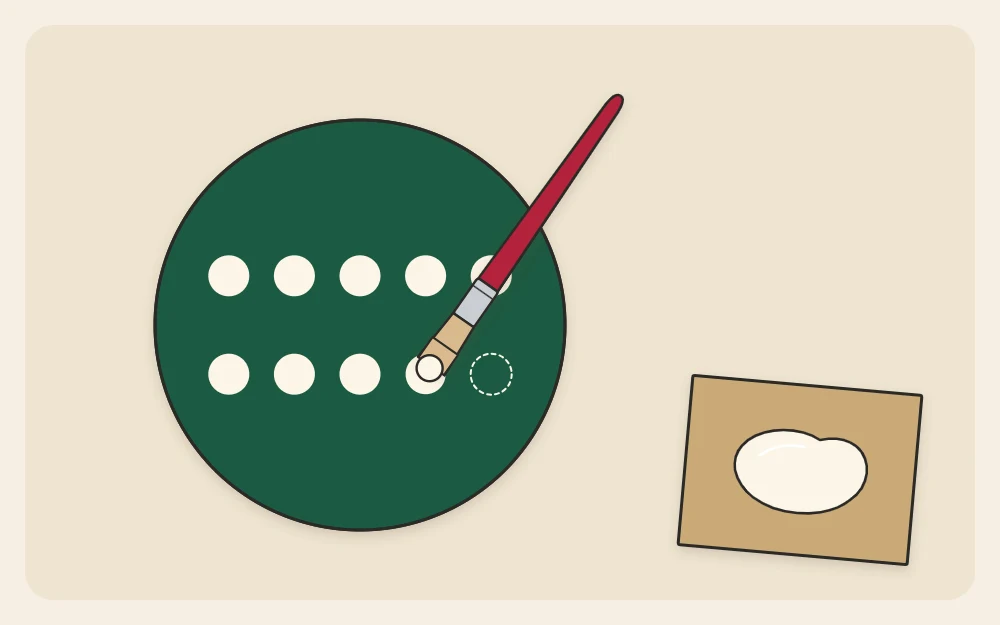
Dots are printed rather than painted. Pour a small puddle of paint onto a lid or a scrap of cardstock, dip your tool straight down into it, then touch it straight down onto the ornament and lift.
- Brush handle end: round, neat dots about 1/8 in (3 mm) across
- Cotton swab: larger, softer dots about 1/4 in (6 mm) across
- Toothpick: tiny dots for centers and fine detail
- Unsharpened pencil end: bold dots for large ornaments
Re-dip for every dot if you want them all the same size. Dip once and print several in a row if you want a trail of dots that shrinks as it goes, which makes a pretty border.
Stripes, bands and zigzags
A flat brush makes a stripe exactly as wide as itself, so let the brush set the width. Pull each stripe in one steady movement from edge to edge, moving your whole arm instead of just your wrist. On a disc, start with the center stripe and work outward to each side so the pattern stays balanced.
A band is simply a single wide stripe, often around the middle of the shape. Edge it with a row of dots above and below, and you have a complete design from two steps.
Zigzags
Freehand zigzags tend to drift. To keep them even, mark two rows of tiny pencil dots about 3/8 in (1 cm) apart, with the bottom row offset so each dot sits halfway between two dots above. Join the dots with short diagonal strokes of a round brush, top to bottom to top. The pencil marks disappear under the paint.
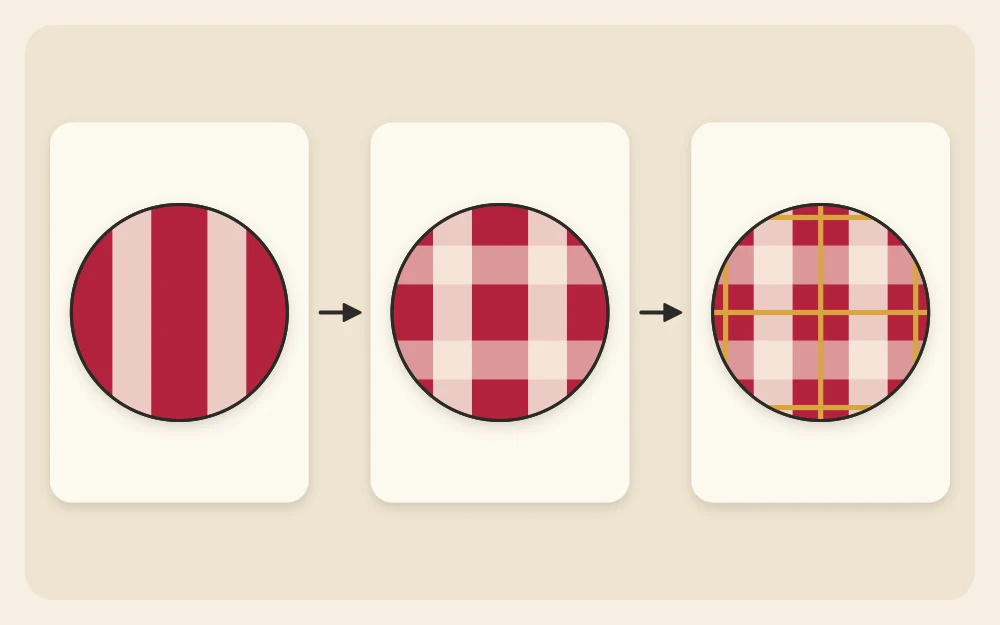
Plaid from crossed stripes
Plaid looks complicated but is only three layers of stripes. The one rule is to let each layer dry to the touch before adding the next, or the colors will drag into each other.
- Paint two or three wide vertical stripes over the dry base coat, leaving gaps about as wide as the stripes.
- When they are dry, paint horizontal stripes of the same width across them. Thin the paint with a drop of water for this layer, so the vertical stripes show faintly through where the two cross.
- When that is dry, add thin accent lines in white or your accent color with a fine round brush or paint pen, running one down the center of each gap in both directions.
Simple sprigs
A sprig is a stem with short strokes coming off it. Paint a gently curved line about 1 in (2.5 cm) long with a round brush. Then add short strokes in pairs along the stem, starting each at the stem and flicking outward and upward so it tapers to a point. Five or six pairs are enough. Finish with three dots at the base for berries.
Sprigs also look good arranged in a ring, tip to tail, to form a loose wreath.
Scattered stars and snowy dots
The easiest star is three short lines crossing at their centers: one vertical, then two diagonals, like an asterisk. Make them in two sizes and scatter them, turning each one slightly so they do not all point the same way.
For snow, print white dots in three sizes over a dark base, using a cotton swab, a brush handle and a toothpick. Place the large dots first, well apart, then fill around them with the smaller ones. Leaving one area of the shape almost empty looks more natural than even coverage.
Spacing that looks even
- Work from the center outward so any leftover space is shared between both edges.
- For a ring of dots, place them like a clock face: 12, 6, 3 and 9 first, then fill the gaps.
- Keep gaps roughly equal to the width of the mark, whether that is a dot or a stripe.
- Stop the pattern about 1/8 in (3 mm) short of the hanging hole.
Tip
Scattered patterns look most natural in odd numbers. Group stars or berries in threes and fives rather than pairs.
Which pattern suits which surface
| Pattern | Tool | Works best on |
|---|---|---|
| Dots and snow | Brush handle, cotton swab | Any shape, including textured ones |
| Stripes and plaid | Flat brush | Flat discs, squares and long narrow shapes |
| Zigzags | Round brush or paint pen | Bands, borders and edges |
| Sprigs and stars | Round brush | Open areas on discs and hearts |
The same patterns carry over to other bases. Dots and sprigs sit well on the matte surface of air-dry clay ornaments, while stripes and zigzags are a natural fit for the long, narrow faces of craft stick ornaments.
Frequently asked questions
What can you use to paint perfect dots on ornaments?
The handle end of a paintbrush is the simplest tool: dip it straight into a small puddle of acrylic craft paint and touch it straight down. A cotton swab gives larger dots and a toothpick gives tiny ones. Re-dip before every dot to keep them all the same size.
How many colors should you use on a painted ornament?
Three colors plus white is a dependable limit. Choose one dark, one mid-tone and one accent, and use the same palette across the whole set. Swapping which color is the base and which is the pattern gives plenty of variety while keeping the ornaments looking like they belong together.
How do you keep a painted pattern evenly spaced?
Start at the center of the shape and work outward, so any extra space ends up split between the edges. For rings of dots, place four first, like the quarter points on a clock, then fill between them. Light pencil marks under the paint help with zigzags and borders.