Felt Snowflake Ornament: Embroidered Lines on a Felt Circle
Embroider a six-spoke snowflake design on a felt circle with backstitch, V stitches and French knots, then back it and blanket stitch the edge. Includes a glued no-stitch version.
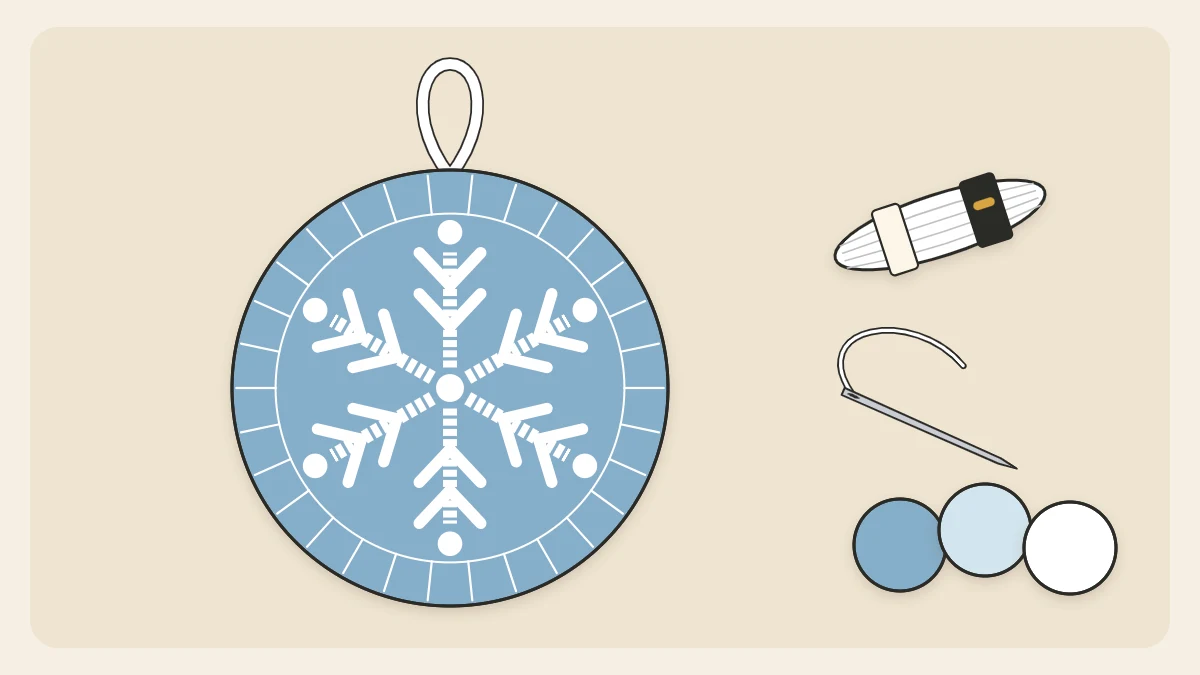
Tutorial at a glance
Materials
- Blue felt for two 3 in (7.5 cm) circles
- White embroidery floss
- Embroidery needle and pins
- Paper for the spoke guide
- Chalk pencil
- 7 in (18 cm) of narrow white ribbon
A felt snowflake ornament does not need a complicated cut-out shape. This one is a plain felt circle with a snowflake-inspired design embroidered on it in white: six spokes, small V stitches along each one and a knot at every tip. The circle does the structural work and the stitches do the decorating.
It is a good first embroidery project because the whole design is made of straight lines, and a paper guide puts the six spokes in the right places.
What you need
- Blue felt, enough for two circles 3 in (7.5 cm) across
- White embroidery floss
- Embroidery needle, pins and sharp scissors (adult tools)
- Plain paper, a pencil and something round to trace
- A chalk pencil or a light-colored fabric marker
- 7 in (18 cm) of narrow white ribbon
- For the no-stitch version: white felt and thick tacky glue
Cutting matching circles, threading floss and working an edge are covered in the guide to felt ornament basics, so this page concentrates on the embroidery.
Cut the circles and make the guide
- Trace a 3 in (7.5 cm) circle on paper, cut it out and use it as a template to cut two felt circles.
- Trim the same paper circle down to about 2 1/4 in (5.5 cm) across. This smaller circle is your spoke guide.
- Fold the guide exactly in half, then fold that half circle into three equal wedges, like a slice of pie. Crease firmly and open it out. You will see six crease lines meeting at the center.
- Snip a tiny notch at the end of each crease and poke a small hole at the center with the needle.
- Center the guide on one felt circle and pin it. Mark a dot on the felt at each notch and one through the center hole.
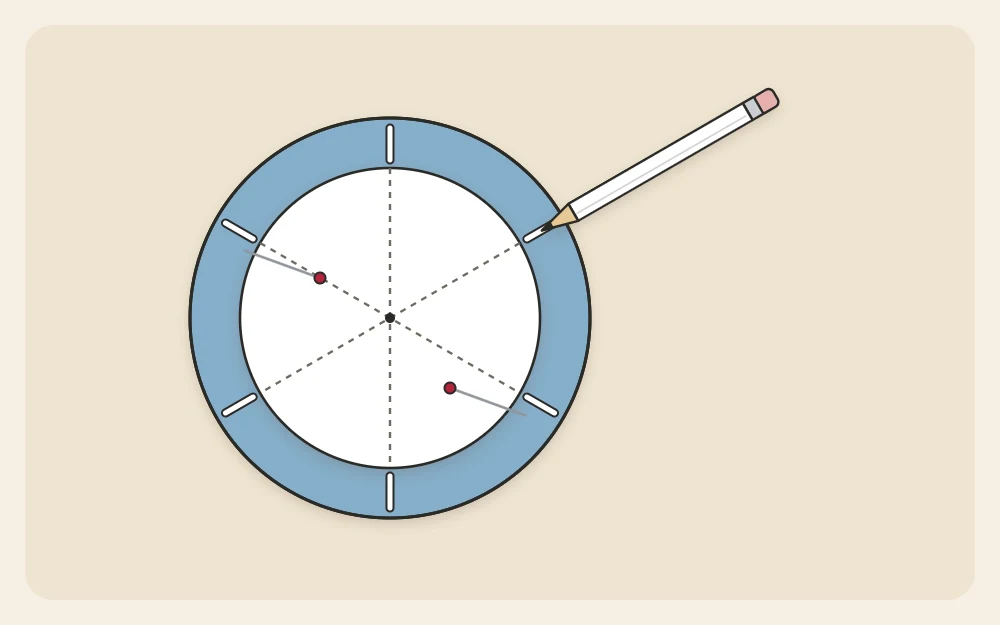
The six dots mark the spoke tips. They sit 3/8 in (1 cm) inside the felt edge, which leaves room for the border stitching later.
Backstitch the spokes
Use three strands of white floss, about 18 in (45 cm) long, knotted at one end. Sew the spokes as three straight lines, each running from one tip dot through the center to the dot directly opposite.
- Bring the needle up from the back about 1/8 in (3 mm) in from a tip dot, along the line toward the center.
- Take it back down at the dot. That is your first stitch.
- Come up again 1/8 in (3 mm) beyond the start of that stitch, and go back down into the same hole where the stitch began.
- Repeat, always coming up one stitch length ahead and going back to meet the previous stitch, so the line is unbroken.
- Stitch straight across the center dot to the opposite tip. Aim at the far dot as you go to keep the line true.
- Sew the other two lines the same way, crossing at the center.
Tip
Felt is thick enough to hide thread. When moving from one spoke to the next, slide the needle through the felt on the back instead of leaving a long strand that could catch.
Add V stitches and French knots
Each V is two short straight stitches that share a point on the spoke and open toward the tip, like a tiny arrowhead pointing at the center.
- About 1/2 in (1.3 cm) from the center, bring the needle up 3/16 in (5 mm) to one side of a spoke and slightly nearer the tip. Go down right on the spoke.
- Come up at the matching point on the other side and go down into the same spot on the spoke.
- Make a second V about 3/8 in (1 cm) farther out on the same spoke.
- Repeat on the other five spokes, keeping the spacing the same.
Finish each tip with a French knot. Bring the needle up at the tip dot, hold the floss taut and wrap it twice around the needle. Keeping hold of the floss, push the needle down a thread’s width from where it came up and pull through slowly until the knot sits on the felt. One more knot at the center covers the crossing.
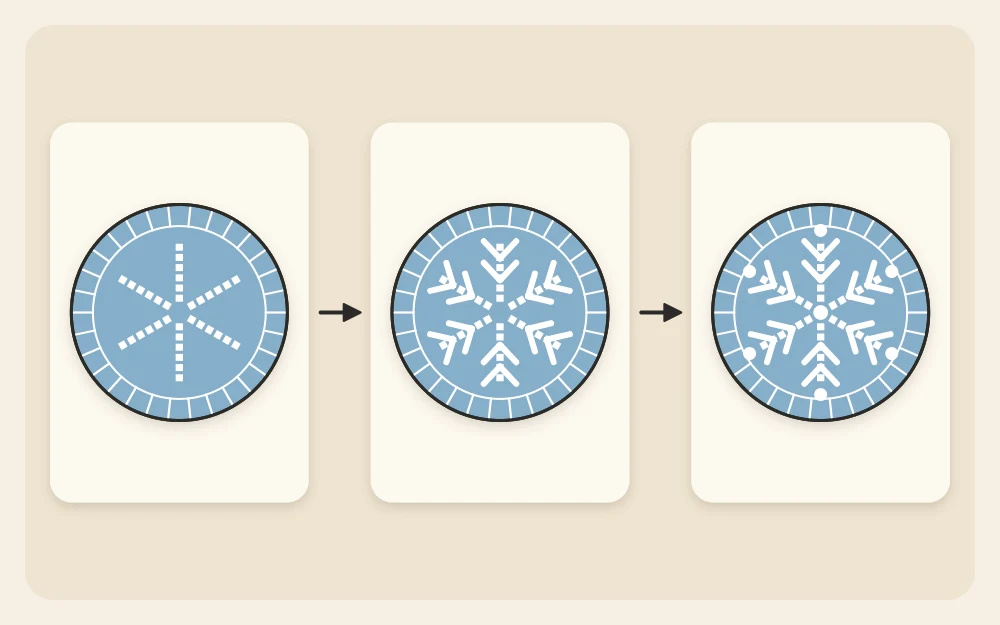
Brush off any remaining chalk with a fingertip once the embroidery is finished.
Back it and stitch the edge
The second circle hides the back of the embroidery and gives the ornament body.
- Fold the ribbon in half. Lay its cut ends 3/8 in (1 cm) inside the top of the plain circle, in line with one spoke tip.
- Place the embroidered circle on top, design facing up, and pin through all layers.
- With two strands of white floss, start between the layers so the knot is hidden and work blanket stitch around the edge, 1/8 in (3 mm) deep and about 1/8 in (3 mm) apart.
- At the top, take two or three stitches through both ribbon ends as well as both circles.
- Join the last stitch to the first, knot at the back and bury the tail between the layers.
The ornament is flat as written. For a slightly padded look, slip a thin pinch of fiberfill inside before closing the last 1 in (2.5 cm). Other ways to attach a hanger are compared in the guide to ornament hanging loops.
The no-stitch version
You can build the same design from felt strips and glue. It has a bolder, chunkier look and suits anyone who would rather not handle a needle.
- Cut three strips of white felt, each 1/8 in (3 mm) wide and 2 1/4 in (5.5 cm) long. Long, slow cuts keep them even.
- Mark the six tip dots on a blue circle with the paper guide, as before.
- Apply a thin line of tacky glue to the back of one strip with a toothpick and lay it from one dot to the opposite dot. Add the other two strips across it.
- Cut twelve pieces of the same narrow strip, each 3/8 in (1 cm) long, and glue them in pairs as V shapes on the spokes.
- Glue a tiny felt circle or a snipped square at each tip.
- Run a line of glue around the edge of the second circle, lay the ribbon ends on it at the top and press the decorated circle on. Rest a book on it while it dries, usually an hour or more depending on the glue; follow the label.
Color ideas and a matching set
White on mid-blue is the classic pairing, but the design reads just as clearly in pale blue on navy or white on red. Vary the pattern from one ornament to the next: three V stitches instead of two, or knots scattered in the spaces.
For a tree with mixed textures, hang these beside strip-built paper snowflake ornaments that share the same six-arm layout.
Frequently asked questions
How do I mark a design on dark felt?
A white or light chalk pencil shows up well on dark felt and brushes away afterward. Mark only dots at the spoke tips and the center instead of drawing full lines, since felt has a fuzzy surface that does not take a fine line cleanly. Test any fabric marker on a scrap first.
Why do my French knots pull through to the back?
The needle is going back down the same hole it came up through. Insert it a thread's width away so the knot has felt to sit on, keep the floss taut with your other hand until the last moment, and pull through slowly. Two wraps are enough with three strands.
Can I embroider the snowflake after sewing the two circles together?
It is much harder. Stitching through both layers leaves the back of the embroidery and every knot showing on the reverse. Embroider the front circle on its own, then add the plain backing circle so all the thread ends are sealed neatly between the two layers.