Mini Wreath Ornaments: Three Easy Ways to Make One
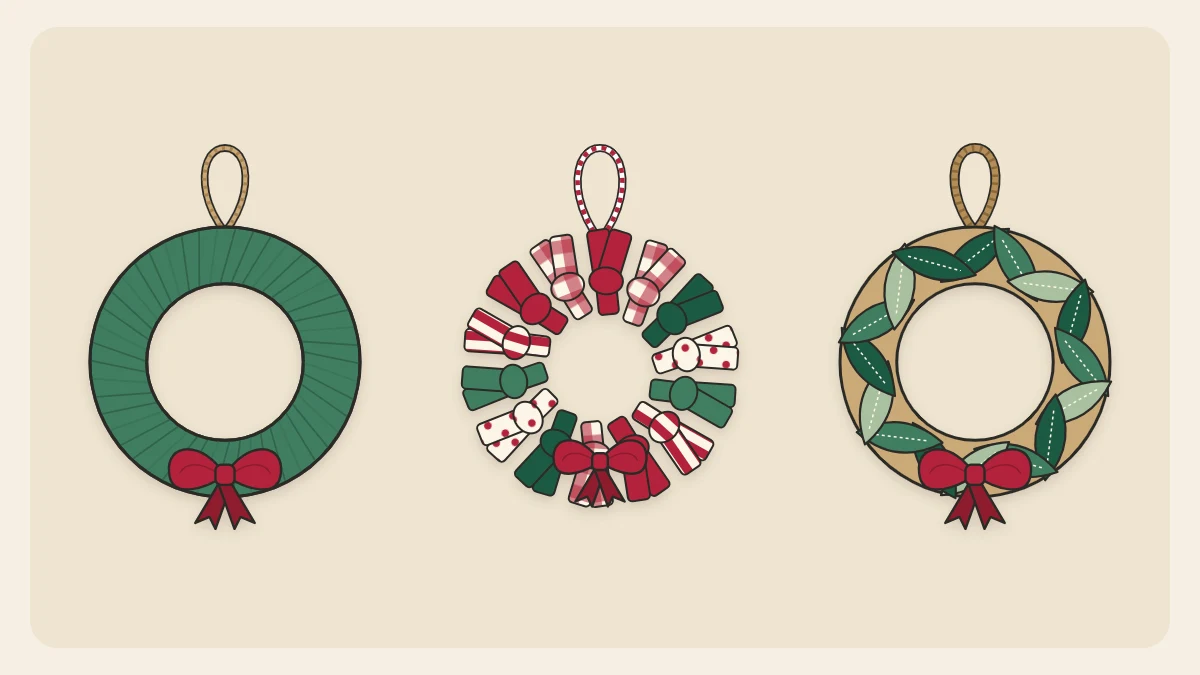
Cut a small cardboard ring and turn it into a tiny wreath three ways: wrapped in yarn, knotted with fabric strips or layered with felt leaves, then add a bow and a loop that hangs straight.
Tutorial at a glance
Materials
- Stiff cardboard or a 3 in (7.5 cm) wooden ring
- Green yarn, cotton fabric scraps or green felt
- Thick tacky glue
- 8 in (20 cm) of narrow red ribbon
- 8 in (20 cm) of twine
- Scissors, pencil and ruler
A wreath shrunk to the size of your palm makes a charming tree decoration, and mini wreath ornaments are a good way to use up short lengths of yarn, fabric offcuts and felt scraps. All three versions here start from the same cardboard ring, so once you have cut one base you can try whichever covering suits the materials you have.
The yarn version is the quickest, the knotted fabric version is the fluffiest, and the felt-leaf version looks most like real greenery.
What you need
- Stiff cardboard, or a ready-made wooden ring about 3 in (7.5 cm) across
- A pencil, a ruler and two round objects to trace
- Scissors
- Thick tacky glue or white craft glue
- Your covering: green yarn, cotton fabric scraps or green felt
- Narrow red ribbon, 1/4 in (6 mm) wide, about 8 in (20 cm) per bow
- Twine or thread for the loop, about 8 in (20 cm)
Cut the ring base
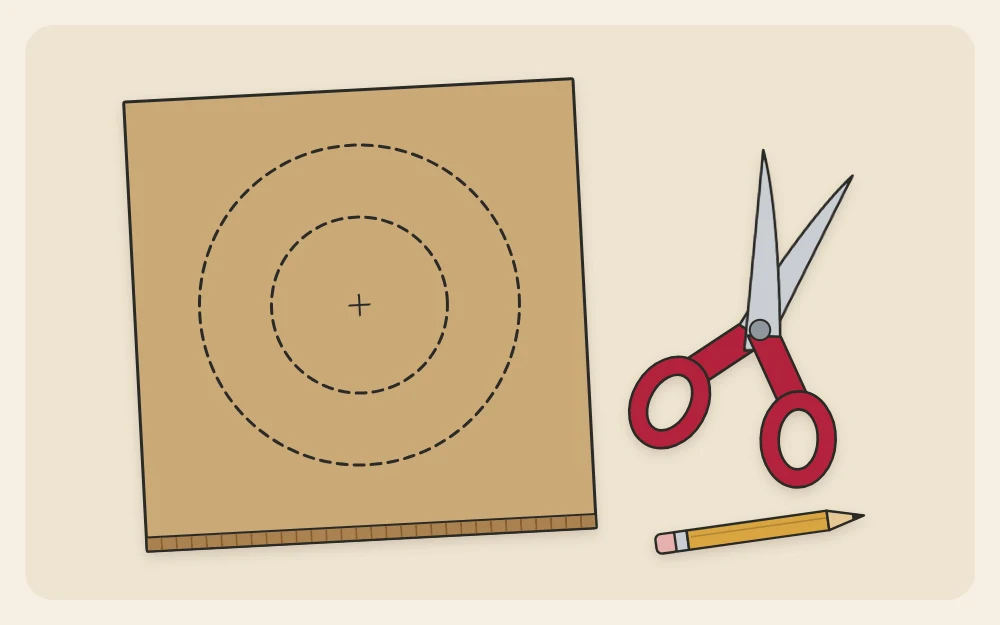
- Trace a circle 3 in (7.5 cm) across onto stiff cardboard. A drinking glass is usually close to the right size.
- Draw a second circle, 1 3/4 in (4.5 cm) across, in the center. A bottle cap or small spice jar lid works. The band between the two lines should be about 5/8 in (1.5 cm) wide all the way around.
- Cut around the outer circle.
- Pierce the middle of the inner circle with the tip of the scissors and cut outward to the line, then around it. This step needs a firm push, so an adult should do it.
If your cardboard is thin, cut two rings and glue them together, then let them dry under a book. A base that bends will twist out of shape as you cover it.
Wreath 1: yarn-wrapped
You need about 5 yards (4.5 m) of medium-weight green yarn.
- Wind the yarn into a small bundle that passes through the center hole.
- Glue the yarn tail to the back of the ring and hold it for about 30 seconds.
- Wrap through the hole and around the band, laying each turn snugly beside the last, until the cardboard is covered.
- Tuck the end under a few wraps on the back and fix it with a dab of glue.
The full method, including two-color wrapping, is in the tutorial for yarn-wrapped ornaments.
Wreath 2: knotted fabric strips
This version needs no glue at all. Light cotton in two or three green prints gives the best result.
- Cut or tear 24 to 30 strips, each about 3/4 in (2 cm) wide and 5 in (13 cm) long. They do not need to be perfectly even.
- Pass one strip through the hole, bring both ends to the outer edge of the ring and tie them in a single firm knot against the edge.
- Tie on the next strip right beside it and push the two knots together.
- Continue around the ring, alternating prints and packing the knots tightly, until no cardboard shows.
- Fluff the tails outward and trim any that are much longer than the rest.
The tails add width, so this wreath finishes at about 4 1/2 in (11.5 cm) across. For more ways to use offcuts, see fabric scrap ornaments.
Wreath 3: felt leaves
Overlapping felt leaves make a wreath that looks like layered greenery. One 9 x 12 in (23 x 30 cm) felt square is enough for several.
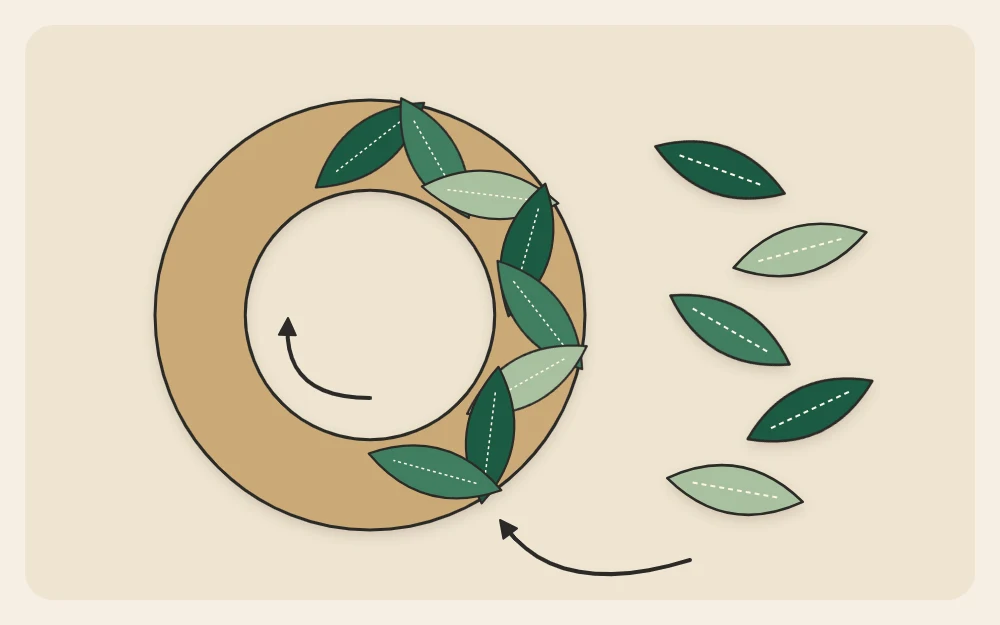
- Cut about 30 leaves, each roughly 1 in (2.5 cm) long and 1/2 in (12 mm) wide, pointed at one end and rounded at the other. Stacking two layers of felt halves the cutting.
- Decide which way the leaves will travel around the ring, for example clockwise, and keep to it.
- Put a dot of tacky glue on the rounded end of one leaf and press it onto the ring, with its point angled toward the outer edge.
- Glue a second leaf beside it, with its point angled toward the inner edge. The pair forms a small V.
- Glue the next pair so that it covers the rounded ends of the first pair, about halfway along. Each new pair hides the glue of the one before.
- Work around the ring. Tuck the rounded ends of the final pair under the tips of the first pair.
Two shades of green, used at random, give the wreath depth. Leave it flat until the glue is dry; the time depends on the room and the product, so follow the label.
Tip
Paint or color the cardboard ring green before adding fabric strips or felt leaves. Any small gap then disappears into the background.
Adding a bow
- Cut 8 in (20 cm) of narrow red ribbon.
- Tie it in a simple shoelace bow and adjust the loops until each is about 3/4 in (2 cm) long.
- Trim the tails at an angle.
- Glue the knot of the bow to the wreath with a dot of tacky glue and hold it for about a minute.
On the felt wreath, place the bow over the spot where the first and last leaves meet to hide the join. Three red beads or tiny buttons glued in a cluster make a berry accent instead of a bow. These are small parts, so keep them away from young children and pets.
Where to put the hanging loop
A wreath hangs straight only when the loop and the heaviest trim sit on the same vertical line. There are two reliable arrangements.
- Bow at the bottom: attach the loop at the exact top, directly opposite the bow. The bow’s weight pulls the wreath level.
- Bow at the top: attach the loop first, then glue the bow in front of it so the loop rises from behind the bow.
To attach the loop, fold 8 in (20 cm) of twine in half, pass the folded end through the center hole from front to back, bring the cut ends through the fold and pull snug around the band. Knot the cut ends together. On the fabric and felt wreaths, ease the twine down between two knots or two leaves so it grips the cardboard and not just the covering.
Hold the wreath up by the loop before the glue on the bow dries. If it tilts, slide the loop a little toward the high side.
Variations to try
- Use white yarn and a silver ribbon for a frosted look.
- Cut a smaller ring, 2 in (5 cm) across with a 1 in (2.5 cm) hole, for gift toppers.
- Glue a single small cone scale or seed pod beside the bow for a natural accent, and pair the wreath with pinecone ornaments on the same branch.
Frequently asked questions
What size should a mini wreath ornament be?
A ring about 3 inches (7.5 cm) across with a 1 3/4 inch (4.5 cm) hole is a comfortable size. It is big enough to wrap or knot without fiddling and small enough to sit on a branch. Fabric strips add width, so that version finishes larger.
How many fabric strips does a small wreath need?
For a 3 inch ring, plan on roughly 24 to 30 strips, each about 3/4 inch wide and 5 inches long. Thicker fabric fills the ring with fewer strips, while thin cotton needs more. Keep tying and pushing the knots together until the base is hidden.
Why does my wreath ornament hang crooked?
The loop is probably not in line with the heaviest decoration. Put the loop at the exact top when the bow sits at the bottom, or directly behind the bow when it sits at the top. Hold the wreath up by its loop and shift it slightly until it hangs level.