Fabric Strip Tree Ornament: Tied Scraps on a Stick
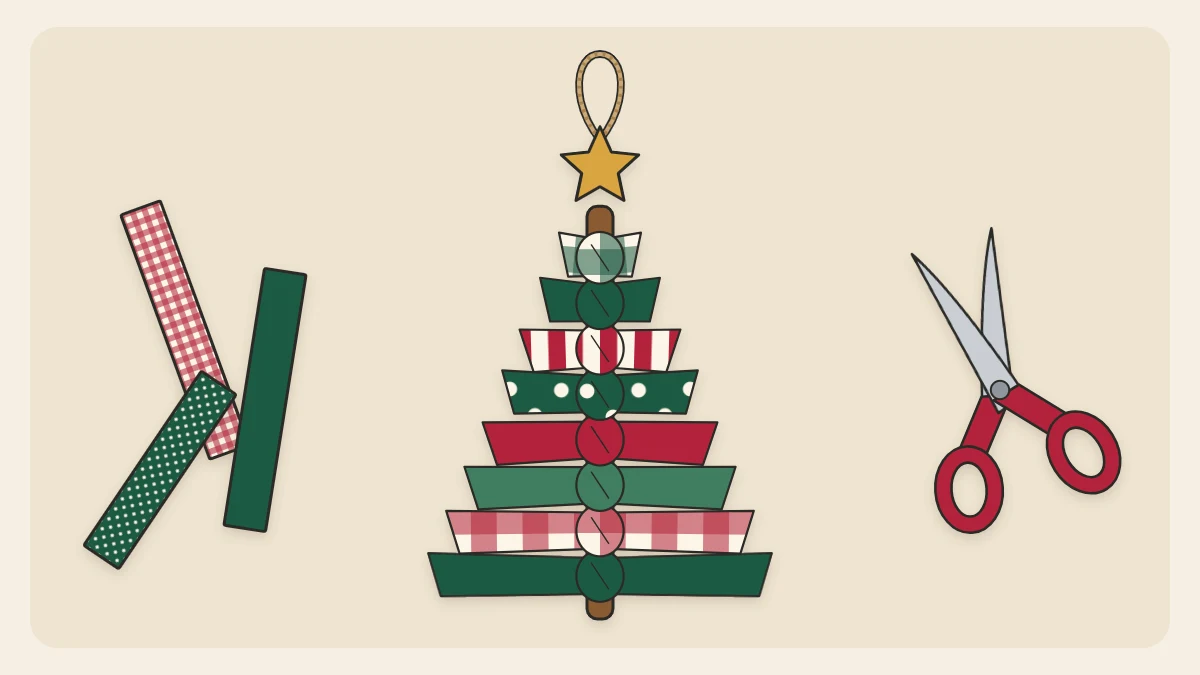
Knot fabric or ribbon strips along a twig, trim them into a triangle and add a star and twine loop. A quick no-sew tree ornament with guidance on strip sizes and a clean taper.
Tutorial at a glance
Materials
- Straight 5 in (12.5 cm) twig
- Cotton scraps or ribbon for 16 strips
- 10 in (25 cm) of jute twine
- Small star button or felt star
- Tacky glue
- Fabric scissors or pinking shears
If you can tie a knot, you can make a fabric strip tree ornament. Short strips of cloth are tied in a row along a stick, then the ends are trimmed at an angle so the whole thing becomes a little shaggy evergreen.
It is a good project for odd leftovers and for making with children, since the knotting needs no tools at all. The only real skill is in the last two minutes, when you cut the taper, so that step gets its own section below.
What you need
- One straight twig about 5 in (12.5 cm) long and no thicker than a pencil
- Cotton fabric scraps or ribbon in two or three prints
- Fabric scissors, and pinking shears if you have them
- 10 in (25 cm) of jute twine
- One small star button or a star cut from felt
- Tacky glue
Scissors and garden snips are adult tools. Let children do the choosing, tying and arranging while an adult does the cutting.
Choosing the stick
Look for a twig that is dry, straight and slightly rough. Bark gives the knots something to grip; a smooth, peeled stick lets them slide. Snap off side shoots, brush away loose dirt and trim both ends square with garden snips.
The advice on picking and drying twigs in the twig star ornament tutorial applies here too. A long cinnamon stick also works as a trunk and adds a mild spice scent; see these cinnamon stick ornaments for how to choose straight ones.
How many strips, and how long
For a 5 in (12.5 cm) stick, cut each strip about 3/4 in (2 cm) wide and 6 in (15 cm) long. Once knotted, a strip of quilting-weight cotton takes up roughly 1/4 in (6 mm) of the stick.
You will leave about 3/4 in (2 cm) bare at the bottom for the trunk and 1/2 in (1.3 cm) bare at the top for the loop, which leaves around 3 3/4 in (9.5 cm) to fill. That works out to roughly 14 to 16 strips; cut 16 and you will have enough. Thicker fabric needs fewer, thin ribbon needs more.
| Stick length | Strip length | Strips to cut |
|---|---|---|
| 4 in (10 cm) | 5 in (13 cm) | About 12 |
| 5 in (12.5 cm) | 6 in (15 cm) | About 16 |
| 6 in (15 cm) | 7 in (18 cm) | About 20 |
Cutting strips and controlling fray
Cut the strips parallel to the woven threads of the fabric so they stay straight when pulled tight. You have three choices for the edges:
- Pinking shears cut a zigzag edge that frays very little and looks neat. This is the tidiest finish.
- Tearing gives a soft, feathery edge. Make a small snip, then rip the cotton along its length and pull off the loose threads.
- Plain scissors are fine too; expect a few stray threads, which you can trim at the end.
Ribbon does not need any of this. Grosgrain and cotton ribbon knot well; slippery satin needs a second knot to stay put.
Tying the strips on
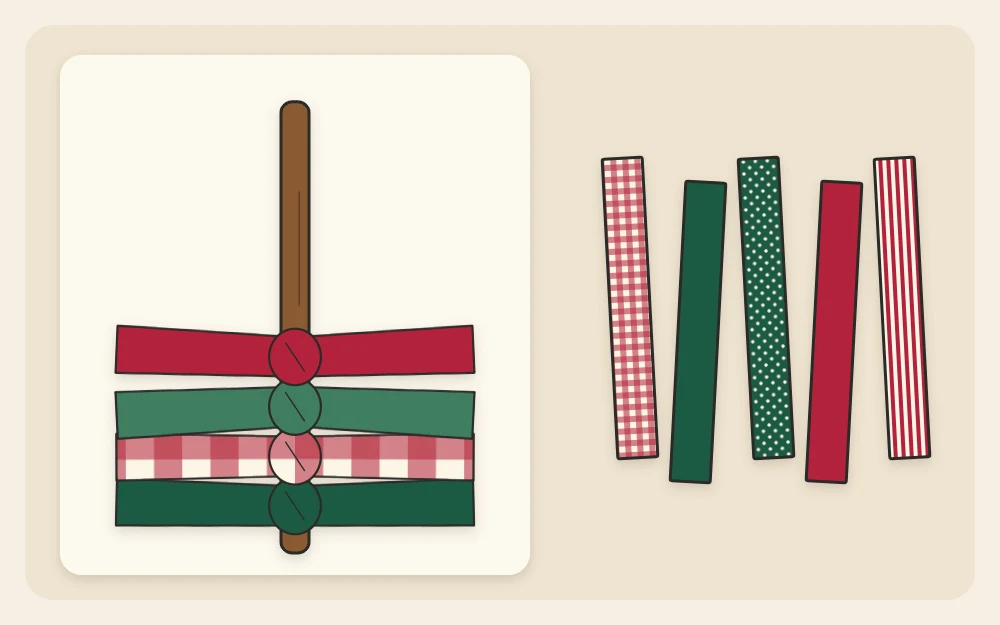
- Lay the stick in front of you with the trunk end at the bottom. Arrange the strips in a row beside it in the order you want, alternating prints: for example green, red, green, cream.
- Slide the first strip under the stick about 3/4 in (2 cm) up from the bottom, with the same amount of fabric on each side.
- Bring both ends up and tie one firm knot on the front of the stick, as you would start tying a shoelace. Pull the ends out sideways, left and right.
- Tie the next strip directly above and push it down tightly against the first.
- Continue up the stick, keeping every knot on the front and facing the same way. Stop about 1/2 in (1.3 cm) from the top.
- Squeeze the row of knots together along the stick and add one more strip if a gap opens.
Tip
If the knots turn around the stick as you work, put a small dot of tacky glue on the twig under the first and last knots. Those two hold the rest in line.
Trimming the taper
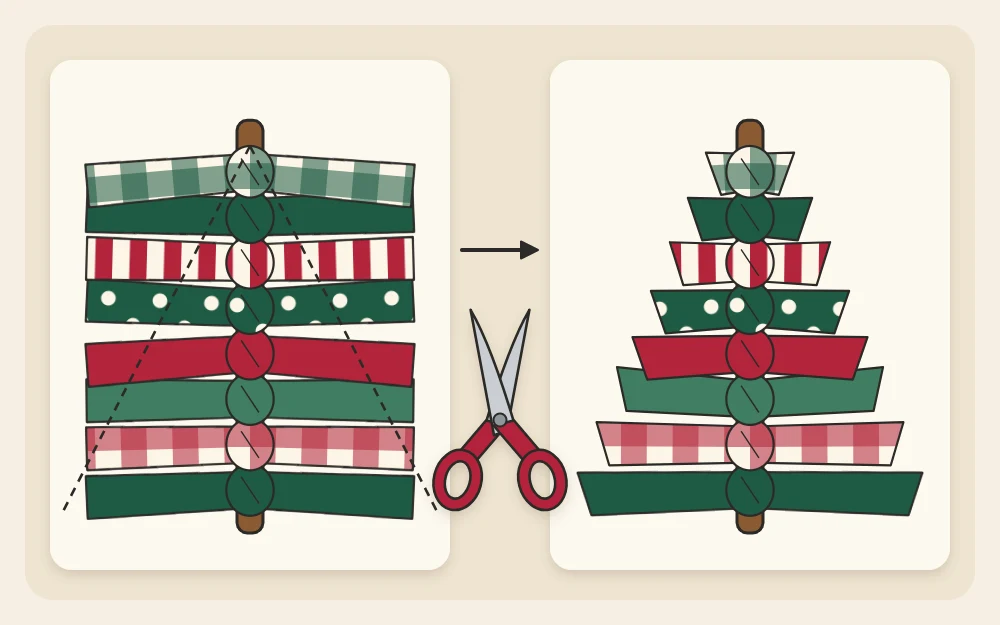
At this point you have a rectangle of fringe. Trimming turns it into a tree.
- Lay the ornament flat with the knots facing up and comb the strips straight out to each side with your fingers.
- Leave the bottom strip at full length, about 2 in (5 cm) on each side of the stick.
- On the right side, picture a straight line running from the tip of the bottom strip to a point about 1/2 in (1.3 cm) from the stick at the top strip. Cut along it in one or two long snips rather than strip by strip.
- Repeat the same angled cut on the left side, then check that both sides slope equally and the stick sits in the middle.
- Hold the tree up, fluff the strips and trim any that stick out. Take off a little at a time; you cannot put length back.
Keep the offcuts. The little triangles are useful for the projects in fabric scrap ornaments.
Adding the star and loop
- Tie the middle of the twine around the bare top of the stick, just above the last strip, with a double knot at the back.
- Bring the two ends together and tie them in an overhand knot about 3 in (7.5 cm) above the stick to make the hanging loop. Trim the tails.
- Put a generous dot of tacky glue on the front of the stick tip and press the star button onto it. A felt star is lighter and easier to glue if the twig is thin.
- Lay the ornament flat until the glue has set, which usually takes about an hour; drying time depends on the room and the product, so follow the label.
Watch out
A button is a small part. Hang the tree on a higher branch, away from young children and pets.
A set of three in different heights looks good hung together, and narrow strips on a shorter stick make a sweet gift topper.
Frequently asked questions
How do I keep the fabric strips from sliding off the stick?
Choose a twig with rough bark, pull each knot firmly and push the strips tightly together so they brace one another. A small dot of tacky glue on the twig under the bottom and top knots keeps the whole row from shifting. Slippery ribbon holds better with a second knot.
Can I use ribbon instead of fabric scraps?
Yes. Grosgrain, cotton and woven-edge ribbons about 3/8 to 5/8 in (1 to 1.5 cm) wide all work, and they do not fray along the sides. Narrow ribbon takes up less room on the stick, so cut a few extra pieces, and trim the ends at a slant after shaping.
Which side of the fabric should face out?
With a simple knot both sides of the strip end up showing, so fabrics that are colored all the way through, such as woven checks and plain cottons, give the fullest look. Printed cotton still works well; the paler wrong side adds a slightly faded, rustic effect once the strips are fluffed.